
Propagation
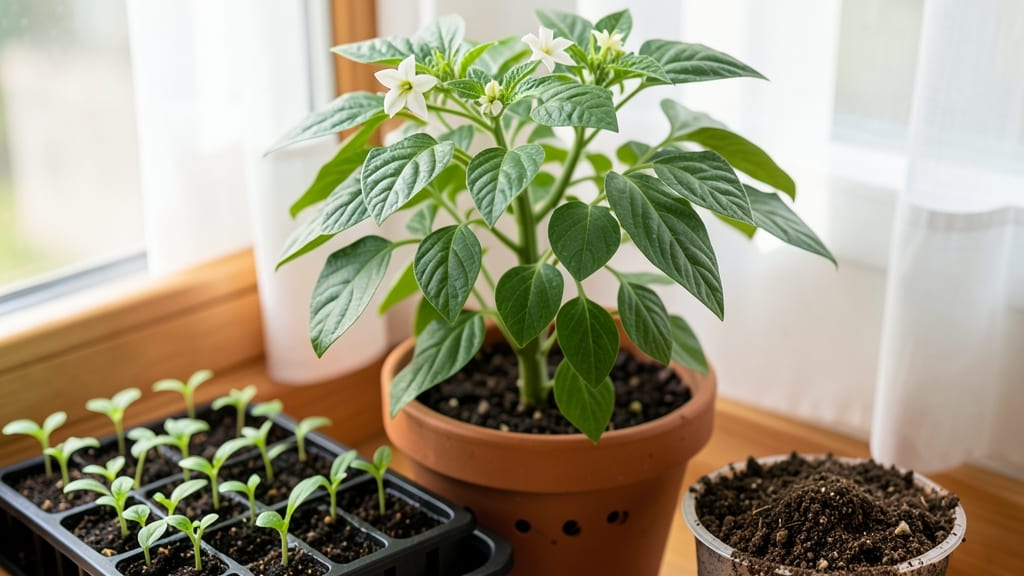
Starting bell pepper seeds indoors gives you a 6-week head start on the season—just don’t rush the process like I did my first year, when I ended up with leggy, weak seedlings that struggled to catch up. 🌱 The secret to fast, strong starts lies in three things: warmth, patience, and the right container setup.
Bell peppers are finicky about temperature, so if you skip this step, you’ll waste seeds on slow germination or damping-off before they even sprout.
You’ll need just five supplies to get going: seed-starting mix (not garden soil), small pots or a seed tray, plastic wrap or a humidity dome, a heat mat (or a warm spot), and a grow light.
The mix should stay moist but not soggy—think of it like a wrung-out sponge—and the heat mat keeps soil temps at 80-85°F until sprouts appear. Without this warmth, germination can take 3+ weeks instead of the usual 7-14 days.
Once sprouted, bell pepper seedlings need 12+ hours of light daily to stay stocky, not stretched. I learned this the hard way when my first batch leaned toward the window like drunken sailors.
After just 10 days, you’ll see true leaves (not the initial seed leaves), and that’s when you can transplant into slightly larger pots. The goal? Burly, dark-green seedlings ready to handle transplant shock when outdoor temps hit 55°F at night.
Here’s where most gardeners trip up: overwatering or skipping the hardening-off process. Bell peppers hate wet feet, so let the top inch of soil dry between waterings, and spend 7-10 days acclimating seedlings to outdoor conditions before planting.
The payoff? Heavier yields of sweet, disease-resistant peppers all season—worth every extra week of patience.
📚 In This Guide
- What you need
- Instructions
- Tips and common mistakes
- Wrapping up and next steps
What you need
- ● Bell pepper seeds: Choose heirloom or hybrid varieties (e.g., Jalapeño, California Wonder, or Sweet Banana). Buy 10–20 seeds for a healthy batch.
- ● Seed-starting mix: A lightweight, sterile potting mix (avoid garden soil). Use 1–2 small seed trays or biodegradable pots (2–3 inches deep).
- ● Containers: Fill trays/pots with mix, leaving ½ inch from the top for watering.
- ○ Grow lights or sunny windowsill: Bell peppers need 12–16 hours of light daily. A full-spectrum LED grow light (optional but ideal) works best.
- ● Misting bottle or spray nozzle: Keep seeds consistently moist without drowning them.
- ● Plastic wrap or humidity dome: Retains moisture until germination (usually 7–21 days).
- ○ Heat mat (optional but helpful): Maintains 75–85°F soil temps for faster germination.
- ● Seedling heat mat: Speeds up germination for fussy bell pepper seeds.
- ● Fertilizer (balanced, water-soluble): Dilute to ½ strength when seedlings sprout true leaves (2–3 weeks in).
- ● pH test kit: Bell peppers thrive in 6.0–6.8 pH soil.
- ● Label markers: Track varieties and planting dates!
How to start bell pepper seeds for fast, vigorous growth
Here's the method I've perfected over years of growing peppers—it cuts germination time in half and produces stocky, disease-resistant seedlings.
🌱 Step 1: Soak Seeds to Kickstart Germination
Bell pepper seeds have tough outer shells that slow down sprouting. Place them in a small bowl and cover with lukewarm water for 12-24 hours. You'll see the water turn slightly cloudy as the seeds absorb moisture. This softens the seed coat so roots emerge faster—often within 5-7 days instead of the usual 10-14.
After soaking, drain the water and lay the seeds on a clean paper towel. Fold the towel to create a damp sandwich—just moist enough that it feels like a wrung-out sponge. Place this between two plates and store in a warm spot (75-85°F), like on top of your fridge. Check daily for sprouting; you'll see tiny white roots pushing through first, followed by the seedling's first leaves.
🪴 Step 2: Prepare Containers and Sterile Mix
Use 4-inch deep seedling trays with drainage holes—peppers hate soggy roots. Fill each cell with a lightweight seed-starting mix (never garden soil). Press the mix down gently so it's firm but not compacted. The goal is a texture like damp coffee grounds—loose enough for roots to penetrate but stable enough to support young stems.
Create a small well in the center of each cell with your finger, about ½ inch deep. Place 1-2 seeds per cell, just below the soil surface. Cover lightly with more mix—don't press down hard, or you'll bury the seeds too deep. Water gently with a spray bottle until the surface looks evenly moist but not glistening.
💧 Step 3: Create Ideal Germination Conditions
Cover the tray with a clear plastic dome or plastic wrap to trap warmth and humidity. Peppers germinate best in 75-85°F soil, so place the tray on a seedling heat mat if your home runs cooler. Without heat, germination can take 2-3 weeks instead of the 5-7 days you're aiming for.
Check the tray daily for condensation on the dome. If it fogs up, the humidity is perfect. If it stays clear, mist the soil lightly to restore moisture. Once 50% of seeds sprout, remove the dome immediately—peppers rot in damp conditions. You'll see the first true leaves emerge 7-10 days after sprouting, signaling it's time to adjust care.
☀️ Step 4: Provide Strong Light Immediately
The instant seedlings break through the soil, move them to a bright, south-facing window or under grow lights. Peppers need 14-16 hours of light daily to grow strong. Without enough light, they stretch toward the window (called "leggy"), becoming weak and prone to disease.
Position grow lights 2-3 inches above the seedlings and raise them gradually as the plants grow. You'll know the light is right when seedlings have dark green, thick stems and leaves spaced 1 inch apart. If they look pale and stretched, lower the lights or move to a sunnier window immediately.
✂️ Step 5: Thin and Harden Off Seedlings
When seedlings reach 2 inches tall, thin to the strongest plant per cell by snipping the weaker one at the base with scissors. This prevents overcrowding and gives the remaining plant more nutrients. Water the soil lightly after thinning to settle the roots.
Two weeks before your last frost date, start hardening off by placing seedlings outside in a shaded, sheltered spot for 1-2 hours the first day. Gradually increase time and sun exposure over 7-10 days. You'll know they're ready for the garden when they tolerate a full day outside without wilting. Transplant on an overcast afternoon to reduce shock.
Tips & tricks for starting bell pepper seeds
Real talk: Those first 7 days after planting can make or break your pepper seedlings. Here's what I've learned to ensure fast, vigorous starts every time.
Soaking Secret: The 12-24 hour soak isn't just about hydration—it's about breaking dormancy. Use lukewarm water (not hot) and change the water halfway through if it gets cloudy. This prevents fungal growth while keeping seeds hydrated. Pro tip: Place a small weight on the bowl to keep seeds submerged if they float.
Temperature Matters: That 75-85°F range is non-negotiable for speedy germination. If your home runs cooler, a seedling heat mat is worth every penny—it can cut germination time from 14 days to just 5-7. I keep mine on top of my fridge where it stays consistently warm. Without heat, you're looking at 2-3 weeks of waiting instead of days.
Lighting Strategy: The instant those seedlings crack through the soil, they need 14-16 hours of light daily. South-facing windows work, but most homes don't get enough sunlight. LED grow lights are my go-to—they're energy efficient and won't overheat your seedlings. Position them just 2-3 inches above the plants and adjust as they grow. Watch for "leggy" seedlings (pale, stretched) as your first warning sign of insufficient light.
Humidity Control: That plastic dome isn't just decoration—it's creating the tropical environment peppers need to thrive. Check daily for condensation on the dome: if it's foggy, you're golden. If it's clear, mist the soil lightly. The moment 50% of seeds sprout, remove the dome immediately to prevent damping-off disease. This is where most beginners lose their seedlings—don't skip this step!
Pro Tips for Starting Bell Pepper Seeds
- Real talk: Those first 7 days after planting can make or break your pepper seedlings. Here's what I've learned to ens...
- Soaking Secret: The 12-24 hour soak isn't just about hydration—it's about breaking dormancy. Use lukewarm water (not ...
- Temperature Matters: That 75-85°F range is non-negotiable for speedy germination. If your home runs cooler, a seedlin...
Frequently asked questions
Got questions about starting bell pepper seeds?
You’re not alone! Here are answers to the most common queries—so you can skip the guesswork and get growing with confidence.
How long does it take for bell pepper seeds to germinate?
Most bell pepper seeds sprout in 10–21 days, depending on temperature and variety. Keep soil consistently warm (70–85°F) to speed up germination. Patience is key—some stubborn seeds take longer, but don’t give up! If nothing sprouts after 3 weeks, try replanting fresh seeds.
When is the best time to start bell pepper seeds indoors?
Start seeds 8–12 weeks before your last frost date (earlier if your growing season is short). For most climates, this means February–March. Bell peppers thrive in warmth, so don’t rush—wait until you can provide 12+ hours of light daily (grow lights help!).
Why aren’t my bell pepper seeds sprouting?
Seeds may fail to germinate due to cold soil, old seeds, or poor moisture. Double-check these fixes:
- Use warm water to soak seeds overnight before planting.
- Keep soil moist (not soggy)—a spray bottle works well.
- Test seed viability by scratching the shell—if it’s hard and unbroken, it’s likely still good.
- Try a heat mat (70°F+) if your home stays chilly.
Do bell pepper seeds need light to germinate?
Nope! Seeds only need warmth and moisture to crack open. Once they sprout, move them to light immediately (12+ hours/day) to prevent leggy seedlings. A sunny windowsill or grow light is your best friend here—no direct sunlight yet!
Can I start bell pepper seeds in soil or should I use a seed-starting mix?
Use a sterile seed-starting mix (not garden soil) to avoid mold and pests. Mix in perlite or vermiculite for drainage. Once seedlings sprout, transplant them into small pots with fresh mix to give roots room to stretch. Skip the soil shortcut—it’s a seedling’s worst enemy!
What if I miss the indoor-starting window? Can I direct-sow bell peppers?
Yes, but only in warm climates (Zone 9+) or after all frost risk has passed. Direct-sow seeds 1/4 inch deep in well-drained soil, spacing them 18 inches apart. Mulch lightly to retain warmth. Just know: seedlings started indoors grow faster and produce earlier!
Wrapping up and next steps
Starting bell pepper seeds is a rewarding journey that leads to a bountiful harvest of vibrant, flavorful peppers! With the right germination secrets—like warmth, patience, and proper care—you’ll soon be enjoying homegrown peppers straight from your garden.
Whether you’re a beginner or a seasoned gardener, every seed you plant is a step toward a fresher, tastier future.
Ready to take the next step? Transplant your seedlings once they’ve sprouted their first true leaves and are strong enough to handle life outdoors. Happy growing—your garden (and taste buds) will thank you! 🌱🌶️